| Getting ready for digital operation | |
|
03/02/14 |
|
|
Getting Started - The Basics For most digital soundcard stations there are 3 basic things you need : [Amateur Transceiver] + [Interface] + [Computer with digital software]
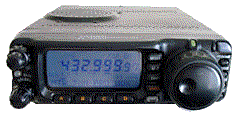
The transceiver
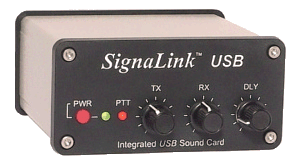
The main things that an interface needs to do for soundcard digital operation are : This can be accomplished with almost any rig with one of the many available digital interfaces or a home brew interface. It can also be done manually or semi-manually without buying or building anything BUT this may NOT be very convenient. I have had several QSO's on digital where the other guy was taking the audio out of their transceiver speaker jack and running it into their computer via the line in or microphone input (using just an audio cable with mini stereo jacks on them) to receive and decode my signal. They would use a desk microphone on their HF rig and just put their microphone next to their computer speaker to pick up the tones generated by their digital software. They would then key their microphone on their HF rig, click on the TX button on the digital software program they were using, and start typing their message to me. The audio tones generated by their digital program went to their computer speaker and the mike on their rig picked it up and transmitted it on the air. When they turned it back to me for my turn to type, they would unkey their microphone, click on the RX button on their software, and the received audio from my signal went into their computer and was decoded by their digital software. I would call this a manual or semi-manual interface and it works BUT not really the ideal way to do it all the time. It is a great way to test and play with digital modes though and see how you like it BEFORE you spend any money or effort on a home brew or commercial interface. If a commercial interface works with ANY soundcard mode they will generally work with ALL soundcard modes whether they list them or not. I personally think there is little to gain by spending several hundred dollars or more on a high end interface UNLESS you have special needs or interests and you really understand what you are getting. I originally bought a BuxComm interface in 2003 for $35 and used it until late 2008 with NO problems. I am now using the SignalLink USB which cost about $100 (with proper cable for my rig). I got it ONLY because it has it's own built-in low noise soundcard and was simple to set up. I really like the SIgnalLink USB unit BUT for Olivia operation the BuxComm worked just as well - the SignalLink USB was just a bit more convenient with it's own soundcard and audio controls. Most interfaces either come with a cable (sometimes at additional cost) that will fit your rigs DATA plug OR Microphone plug depending on which you have or plan to use. IF you have BOTH - it is always better to use the DATA plug. That way you don't have to unplug the microphone to do digital operation since they are usually independent of each other. When you order most interfaces you need to know ahead of time what kind of DATA plug or microphone plug your rig has and how many pins it has. Many rigs have 2 DATA plugs on them also. One is often for controlling frequency and other rig control functions via computer software. The other is for hooking up a digital interface. Some rigs may do this in a single plug (not sure of that) but many have 2 plugs. So, if you are going to just get an interface - you need to make sure that you identify the proper plug for the proper function. On my Yaesu FT-100D, for instance, I have a 6 pin data connector that is used to connect to the SignalLink USB interface via the cable that came with it (I specified my rig when I ordered it). I also have an 8 pin Data connector that I use a CAT cable with (I bought separately) to do rig/frequency control. One end of the CAT cable goes to the 8 pin Data connector on the Yaesu while the other end terminates in a serial port plug and connects to the serial port on my computer. The rig control can be accomplished with various software programs and I can change freq, mode, band, and a few other things on the FT-100D without having to physically touch the rig. Most of the digital programs that run Olivia also can utilize both the CAT and the interface functionality at the same time so I seldom actually touch the rig any more. So, when you decide to start using digital soundcard modes and you decide you want to buy or build an interface you need to read the manual for your rig and be familiar with what it has to offer in the way of data connectors and what they are used for. I would greatly suggest searching to see if there is a Yahoo Group specifically for your rig if you can't clearly understand the information in your manual - since some of the manuals are vague and not very detailed. A Yahoo Group specifically for your rig can be a valuable resource and you can see what others have tried and used that work well for them. The Yaesu FT-100 Yahoo group helped me a lot when I first started thinking about digital operation.
The computer
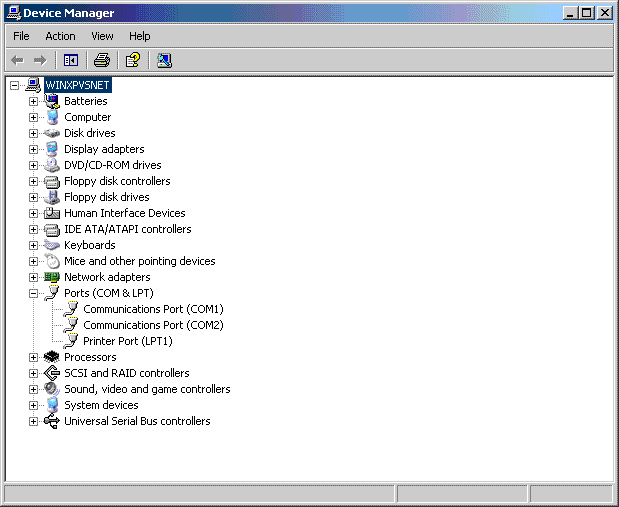
The Software So you have gotten the computer, the interface, and the rig hooked up. What now? Well, it's time to install and set up the software. I will give an overview and general idea on how that is done in WIndows XP. I won't give a detailed explanation of how to do this because the programs themselves already have their own help files and instructions. The first thing you need to do is enable your software so it can key your transceiver. If you are using an interface that uses VOX to do that or you are doing it manually then you can skip this part. However, if you have one of the many interfaces that use a serial port or USB port to key the rig than you need to let your software know what serial port or USB port it is using. In Windows XP you need to navigate to the Control Panel and double click on the System icon to bring up the System Properties dialog box. Then go to the Hardware tab and click on the Device Manager button towards the top to bring up the Device Manager dialog as shown below :
Note, on the picture above, that I clicked on the little plus sign to the left of "Ports" and it opened up and displayed the serial ports and printer port on the computer. After it opened that category the plus sign changed to a minus. If you had a USB to serial adaptor it should show up here also. IF you do NOT see your serial port(s) listed then you may need to make sure that they are ENABLED in the BIOS setup program of your computer. Consult your motherboard manual or other documentation to see how to access the BIOS setup program. On most computers you bring up the BIOS setup program by clicking on the Delete or F2 key repeatedly (but slowly) immediately after you turn the computer on until the setup screen appears. In the BIOS setup program you need to find the appropriate tab or screen that has the serial port setting(s) and make sure all the ports that you need are enabled. You should be VERY careful when you access the BIOS setup program AND NOT change anything unless you are sure that you know what you are doing. If you are NOT sure - get someone to help you that knows what they are doing. The next thing is, of course, to install one of the software programs that support Olivia onto your system. After doing so, you will want to go into the configuration or settings dialog in your digital program and select or enter the COM port that you will be using to key your transceiver. If you are using an external soundcard or other solution that uses it's own VOX system then you would skip this part. Next you would want to make sure your digital program is set up to use the proper soundcard. If you only have ONE sound card on your system then most of the digital programs will choose it by default. If you have more than one sound card, though, you need to select the appropriate one. In some digital programs that may not be possible or may not work. It might, in that case, be necessary to set the DEFAULT Windows system sound card to the one that you plan to use for digital operation so it will work properly. You would go to the Windows Control Panel and double click on the Sound and Audio Devices icon to bring up the property box for it and (as I did on my system as shown below) set the Default device in the drop down boxes for both the Sound playback and Sound recording for the sound card that your digital program needs. The USB Audio CODEC selection I made below is the sound card inside the SIgnalLink USB interface I now use.
Those are the basic things that need to be done to get your rig, interface, and computer working together to do digital soundcard mode operation. You will also want to enter your personal information into whatever program you are using. The basics, such as your callsign, name, QTH, and more are usually used by the programs macros. The macros can be used to eliminate a lot of typing for mundane information. You may also want to create your own macros and/or edit the existing macros that came with the program to suit your style and needs. And most programs have many other things you can personalize such as fonts, colors, etc. to suit your personal taste. ++++ END ++++ ++++ Be sure to read the next section on Getting Started On Olivia ++++ |
This site was last updated 10/15/09
Slot RTP tertinggi sering kali menjadi buruan pemain berpengalaman yang ingin memaksimalkan keuntungan mereka. Dengan RTP live online yang gacor, setiap kemenangan terasa lebih bermakna karena tingkat pengembaliannya yang menggiurkan. Mesin-mesin ini menawarkan sensasi berbeda, membuat pemain merasa lebih percaya diri setiap kali memutar gulungan. RTP slot gacor tidak hanya menjanjikan kemenangan, tetapi juga pengalaman bermain yang lebih menyenangkan.
Bermain slot kini semakin mudah dengan Slot Depo 5k, di mana Anda dapat menikmati permainan berkualitas tanpa mengeluarkan banyak biaya. Dengan fitur ini, pemain dapat mencoba keberuntungan sambil tetap menikmati peluang besar untuk meraih kemenangan. Banyak situs juga memberikan bonus tambahan untuk setiap deposit 10 ribu.
Mahjong Ways 2 menghadirkan sistem bonus yang menguntungkan, didukung oleh Scatter Hitam yang legendaris. Setiap pemain memiliki kesempatan untuk meraih hadiah besar berkat fitur-fitur inovatif dalam game ini. Mahjong Slot juga dirancang dengan grafis berkualitas tinggi yang memanjakan mata. Gameplay yang lancar memastikan pemain bisa fokus pada strategi untuk menang. Dengan Mahjong Ways 2, keseruan dan keberuntungan berjalan beriringan.
PvP mode terbaru bikin gameplay jadi lebih kompetitif dari sebelumnya, ulasannya bisa kamu baca pada Jktgame. Event double XP selalu ditunggu pemain. Ini waktu terbaik buat leveling cepat.
Untuk para pemain togel yang mencari hadiah terbesar, Togel Hadiah Terbesar adalah pilihan yang sangat menguntungkan. Hadiah yang besar ini memberikan peluang bagi siapa saja untuk meraih kemenangan besar dalam permainan togel online. Pastikan Anda memilih situs yang menawarkan Togel Hadiah Terbesar agar pengalaman bermain Anda semakin menyenangkan dan menguntungkan.
Keamanan menjadi prioritas utama dalam situs toto togel online terpercaya. Toto slot dan permainan togel dilengkapi dengan sistem enkripsi yang memastikan data pemain tetap aman. Setiap transaksi dilakukan melalui sistem yang telah teruji keandalannya. Dengan perlindungan maksimal, pemain bisa menikmati permainan tanpa rasa khawatir. Semua ini memberikan pengalaman bermain yang lebih nyaman dan menyenangkan.
Memilih situs yang tepat untuk bermain Toto Macau sangat penting agar pengalaman bermain semakin nyaman dan menguntungkan. Situs terpercaya selalu menyediakan Data Macau yang lengkap, sehingga pemain bisa memantau Keluaran Macau dengan mudah. Result Macau yang diumumkan juga selalu sesuai dengan hasil resmi, tanpa adanya manipulasi atau kecurangan. Dengan adanya Live Draw Macau yang disiarkan secara langsung, pemain bisa memastikan keabsahan angka yang diumumkan setiap harinya. Keamanan transaksi dan kelengkapan permainan menjadikan pengalaman bermain togel semakin menyenangkan.
Kecepatan dan kenyamanan bermain menjadi faktor penting dalam memilih platform slot online. Slot88 hadir dengan teknologi canggih yang memastikan permainan berjalan lancar tanpa lag atau gangguan. Dengan desain responsif, situs ini dapat diakses dengan mudah melalui berbagai perangkat, baik smartphone, tablet, maupun komputer. Pemain dapat menikmati tampilan game yang mulus serta kontrol yang nyaman meskipun bermain dari layar yang lebih kecil. Dengan performa yang optimal, Slot88 menjadi pilihan terbaik bagi siapa saja yang ingin menikmati pengalaman bermain tanpa hambatan.
Bermain di situs slot gacor memberikan pengalaman seru dengan peluang besar mendapatkan keuntungan. Pemain yang memilih slot 777 akan menemukan permainan dengan sistem yang telah diuji untuk memberikan hasil optimal. Slot777 hadir dengan fitur menarik yang dapat meningkatkan kesempatan menang setiap kali bermain. Dengan sistem permainan yang adil dan transparan, pemain bisa merasa lebih nyaman dalam memasang taruhan. Keunggulan lainnya adalah tersedianya berbagai pilihan permainan yang bisa disesuaikan dengan gaya bermain masing-masing.
Dalam pembahasan hiburan kreatif, slot Thailand sering dipakai untuk melambangkan tata ruang digital. Slot server Thailand memastikan arus data hiburan tetap konsisten. Istilah slot gacor Thailand muncul ketika sistem berjalan tanpa hambatan. Situs slot Thailand banyak disebut sebagai pusat data hiburan yang modern. Maka hiburan kreatif online kini menjadi inspirasi bagi banyak kalangan.
Situs Toto Slot menghadirkan pengalaman bermain yang lebih hidup dengan grafis yang tajam dan efek suara yang mengesankan. Slot Toto dirancang dengan teknologi terbaru untuk memberikan sensasi permainan yang lebih mendalam. Situs Toto bekerja sama dengan provider game yang menghadirkan fitur interaktif dalam setiap permainan. Dengan animasi yang halus dan desain visual yang menarik, pemain akan merasa lebih terlibat dalam permainan. Hal ini menjadikan Situs Toto sebagai pilihan utama bagi pemain yang menginginkan pengalaman bermain terbaik.
Bermain Toto Togel di Situs Togel terpercaya memberikan rasa aman dan kenyamanan maksimal. Platform Toto Togel Online berkualitas selalu menjamin transaksi cepat dan data pemain terlindungi. Situs Toto profesional juga menyediakan layanan pelanggan 24 jam untuk membantu setiap masalah. Semua faktor ini membuat pengalaman bermain Toto Togel lebih menyenangkan dan bebas dari rasa khawatir.
Permainan Toto macau kini semakin populer di berbagai negara Asia karena transparansinya yang tinggi. Dengan adanya Live draw macau, pemain bisa menyaksikan hasil undian angka secara langsung. Result macau yang diumumkan resmi setiap hari memberikan jaminan keaslian. Catatan Keluaran macau juga membantu para penggemar Toto macau untuk menyusun strategi cerdas.
Situs togel modern kini mengutamakan kemudahan transaksi dengan sistem pembayaran otomatis yang cepat dan aman. Togel158 mengadopsi teknologi ini sehingga proses deposit dan withdraw dapat berjalan tanpa hambatan dan instan. Dengan sistem otomatis, pemain tidak perlu menunggu lama untuk mulai bertaruh atau mencairkan kemenangan. Kecepatan layanan ini meningkatkan kenyamanan dan membuat pemain semakin betah. Teknologi pembayaran seperti ini menjadi standar layanan di dunia togel online.
Sebelum mulai main, penting banget buat paham dulu soal keamanan data. Banyak yang asal daftar tanpa tahu kalau Situs Togel nggak semuanya bisa dipercaya. Pemain yang bijak pasti bakal pilih Togel Terpercaya dengan sistem transparan. Biasanya mereka kumpul di Situs Togel Terpercaya karena udah punya reputasi kuat. Kalau udah yakin, tinggal main aja di Togel Resmi bareng Bandar Togel terbaik.
Banyak pemain merasa nyaman memulai dengan slot bet kecil setiap harinya. Slot bet 200 sering jadi opsi seimbang dengan peluang menarik. Slot bet 100 menawarkan putaran cepat yang ringan untuk dicoba siapa saja. Slot bet 400 menambah sensasi adrenalin bagi penggemar tantangan lebih besar. Slot bet 200 perak memberi kesan unik karena modalnya sederhana. Semua variasi ini membuat hiburan digital terasa lebih lengkap.
Platform Slot Depo 10k dibuat untuk menghadirkan keamanan dan kenyamanan dalam setiap sesi bermain. Lewat Slot Qris, kamu bisa bertransaksi tanpa takut gangguan sistem atau keterlambatan. Bermodalkan Slot 10k, setiap pemain bisa menikmati permainan menarik dengan peluang menang besar. Fitur Depo 10k juga memberi kemudahan dalam mengatur strategi bermain sesuai budget. Semua itu menjadikan Slot Deposit 10k sebagai solusi terbaik bagi pencinta hiburan online.
Turnamen PvP fun match ini cocok buat latihan sebelum kompetisi resmi di togel resmi. Update konten bikin player lama kembali aktif. Rasa penasaran muncul lagi.
PvP custom room sekarang makin fleksibel berkat fitur baru yang aktif di situs toto. Event kompetitif bikin adrenalin naik. Fokus dan konsentrasi jadi lebih tinggi.
Skin terbaru ini punya efek ultimate yang beda total dari skin standar. Perbandingannya ada di Togel Terpercaya. Event quest kolaborasi bikin cerita game makin menarik. Banyak cutscene yang sayang kalau dilewatin.
Skin eksklusif hasil event lama ini akhirnya bisa didapat lagi cek caranya di Togel Online. Event spesial sering punya cerita menarik. Lore game jadi makin dalam.
Turnamen mingguan PvP memberikan hadiah besar untuk pemenang, pastikan timmu siap bertanding di TOTO TOGEL. Skin eksklusif event bikin karakter unik. Pastikan login setiap hari untuk dapat.
Skin eksklusif battle royale mode ini punya efek kill announcement berbeda dari biasanya, detail tampilannya cek toto. Update sistem notifikasi guild mempermudah koordinasi jadwal event internal. Anggota jadi nggak ketinggalan informasi penting.
Patch note lengkap beserta perubahan statistik hero tersedia, baca di Toto Slot. Update grafis bikin efek cahaya makin realistis. Pengalaman visual terasa lebih imersif.
Turnamen antar guild makin seru, pantau update novaslot88. Event terbatas sering jadi incaran. Itemnya jarang tersedia lagi.
Populeritas prosedur cepat Togel178 Daftar terus meningkat pesat di kalangan milenial yang mengutamakan kepraktisan. Tidak ada lagi hambatan birokrasi yang rumit saat Anda ingin memulai petualangan di dunia digital.
 +
+ +
+